
Step 1 – Setup
Audacity is obtainable for each Home windows and Mac gadgets, so to start out, obtain Audacity onto no matter system you’re utilizing! Whenever you first open Audacity you may see a set of toolbars on the high, together with Transport (Play, Cease, and so forth.), Instruments, and Quantity/Meters for microphone enter and playback.

Should you’re lacking a toolbar or wish to customise which toolbars are seen, choose View > Toolbars and test/uncheck from the menu as you want. It’s also possible to rearrange the toolbar order utilizing the “Grabber” column on the left finish of every, or resize a given toolbar utilizing the “Drag Bar” column on the proper finish.
Professional Tip: Utilizing the Drag Bar to elongate Microphone or Playback Quantity controls can create extra space to make granular slider changes.
The Gadget Toolbar
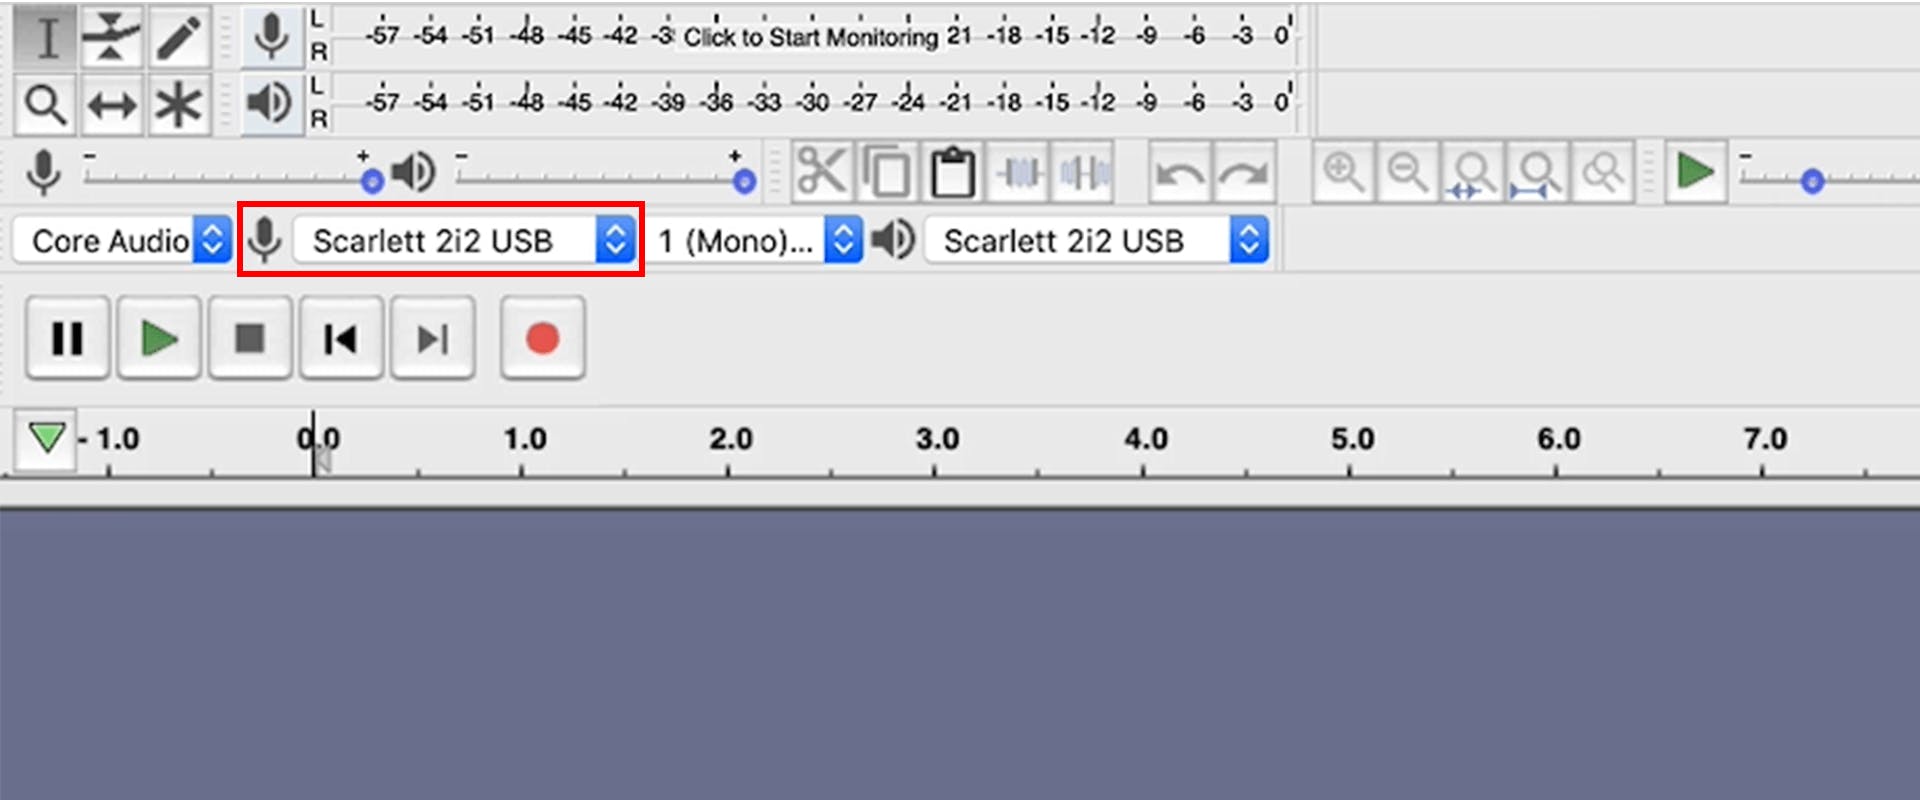
Subsequent, you may see the Audacity Gadget Toolbar, the place you can also make routing choices from a handful of dropdown menus. From left to proper, you’ll be able to select your audio host, recording system, recording channels, and playback system.

Should you’re utilizing Audacity with MacOS, Core Audio shall be your solely selection for Audio Host. On Home windows, there are a handful of choices, however the default MME is most suitable with all audio gadgets.
From the Recording Gadget menu, select your related audio interface, such because the Scarlett 2i2, or in the event you’re utilizing a USB mic just like the Audio-Technica ATR2100 choose it right here.
In case your interface or mic will not be obtainable from the dropdown, a couple of troubleshooting steps embrace ensuring your mic/interface is plugged in and turned on and checking your laptop system preferences to confirm that your interface/mic is related and chosen. If these steps take a look at, closing and restarting Audacity can generally jog its reminiscence. It’s also possible to seek the advice of Audacity’s in depth handbook for additional assist.
Should you’re recording one microphone, select 1 (Mono) Recording Channel from the Recording Channels dropdown. Within the case of a two-person interview, you may choose 2 (Stereo) Recording Channels. Notice: despite the fact that Audacity provides as much as 14 recording channels from the dropdown, you’ll be able to solely document as many channels as you could have obtainable in your interface/mixer/and so forth. Extra on this beneath.
Lastly, choose your Playback Gadget, which tells Audacity the place to play the audio out of your session. This choice could differ relying on whether or not you are recording or enhancing. When recording, it’s best to monitor via headphones fairly than audio system to keep away from making a suggestions loop or inflicting bleed – and to offer you rapid consciousness of how you could want to regulate your mic method. When enhancing, you could desire to pay attention on screens, during which case you could want to change your playback system.
Check Your Enter
The ultimate step earlier than you start recording is to check your microphone. Along with your Recording Gadget chosen, reference the microphone meter and, if crucial, choose the ‘Click on to Begin Monitoring’ button.

With the meter engaged, start talking at a snug stage and enhance or lower the Microphone Quantity slider in order that it registers peaks round -12dB. This could go away satisfactory headroom that will help you keep away from clipping your enter sign.
![]()
When you set your enter stage, you are able to document.
Recording
In contrast to some audio editors or DAWs, Audacity will routinely create high-quality tracks for every chosen Recording Channel as soon as you start recording. Press the purple Document button within the Transport toolbar (or keyboard shortcut R) to start your audio recording.
![]()
Whenever you’re prepared to finish the recording, press the spacebar.
Multi-track Recording
Two Tracks
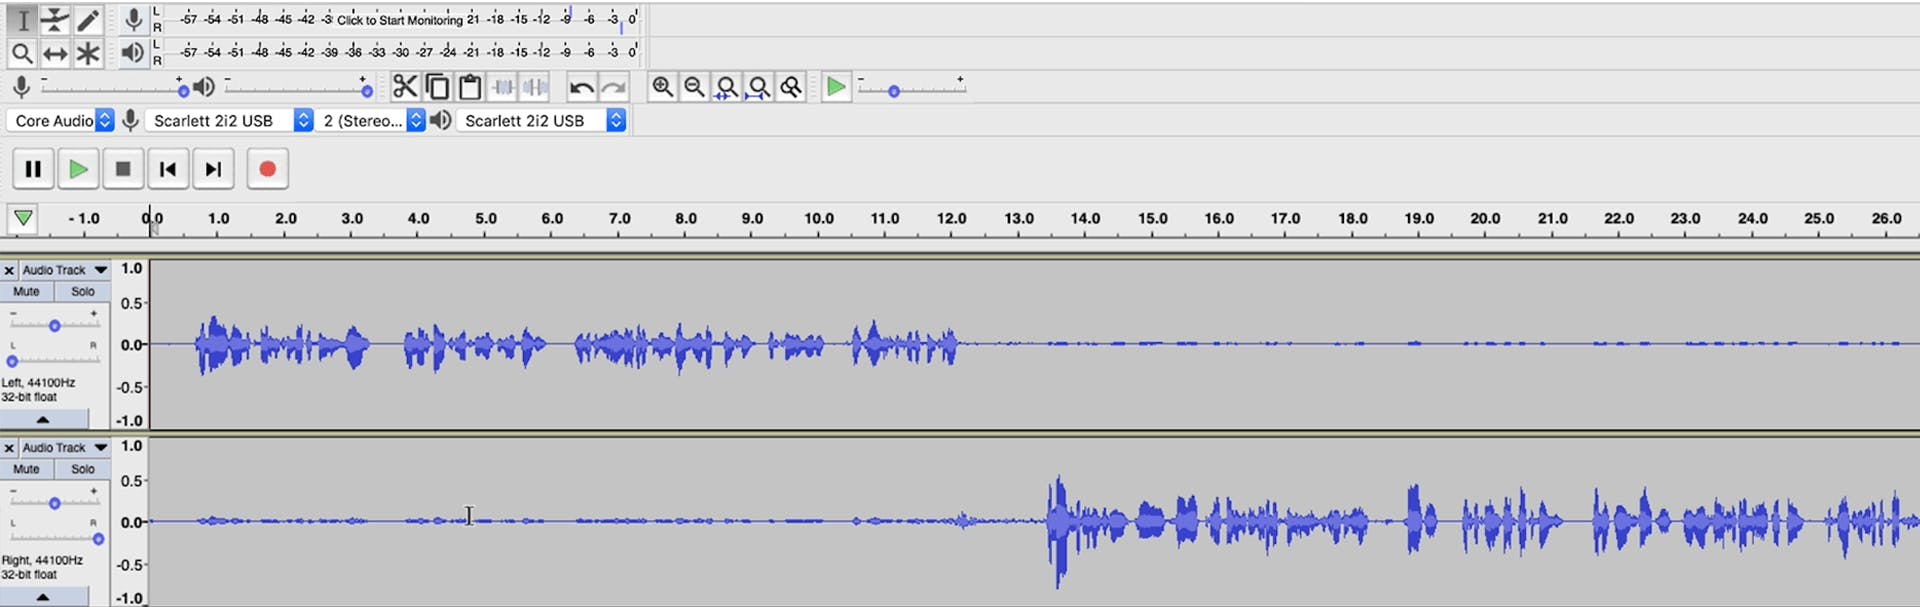
Should you’re recording two microphones without delay, like we’re doing right here with the Scarlett 2i2, you may choose 2 (Stereo) Recording Channels from the recording channels toolbar. This can document each channels right into a single stereo file, with enter 1 on the left channel and enter 2 on the correct channel.
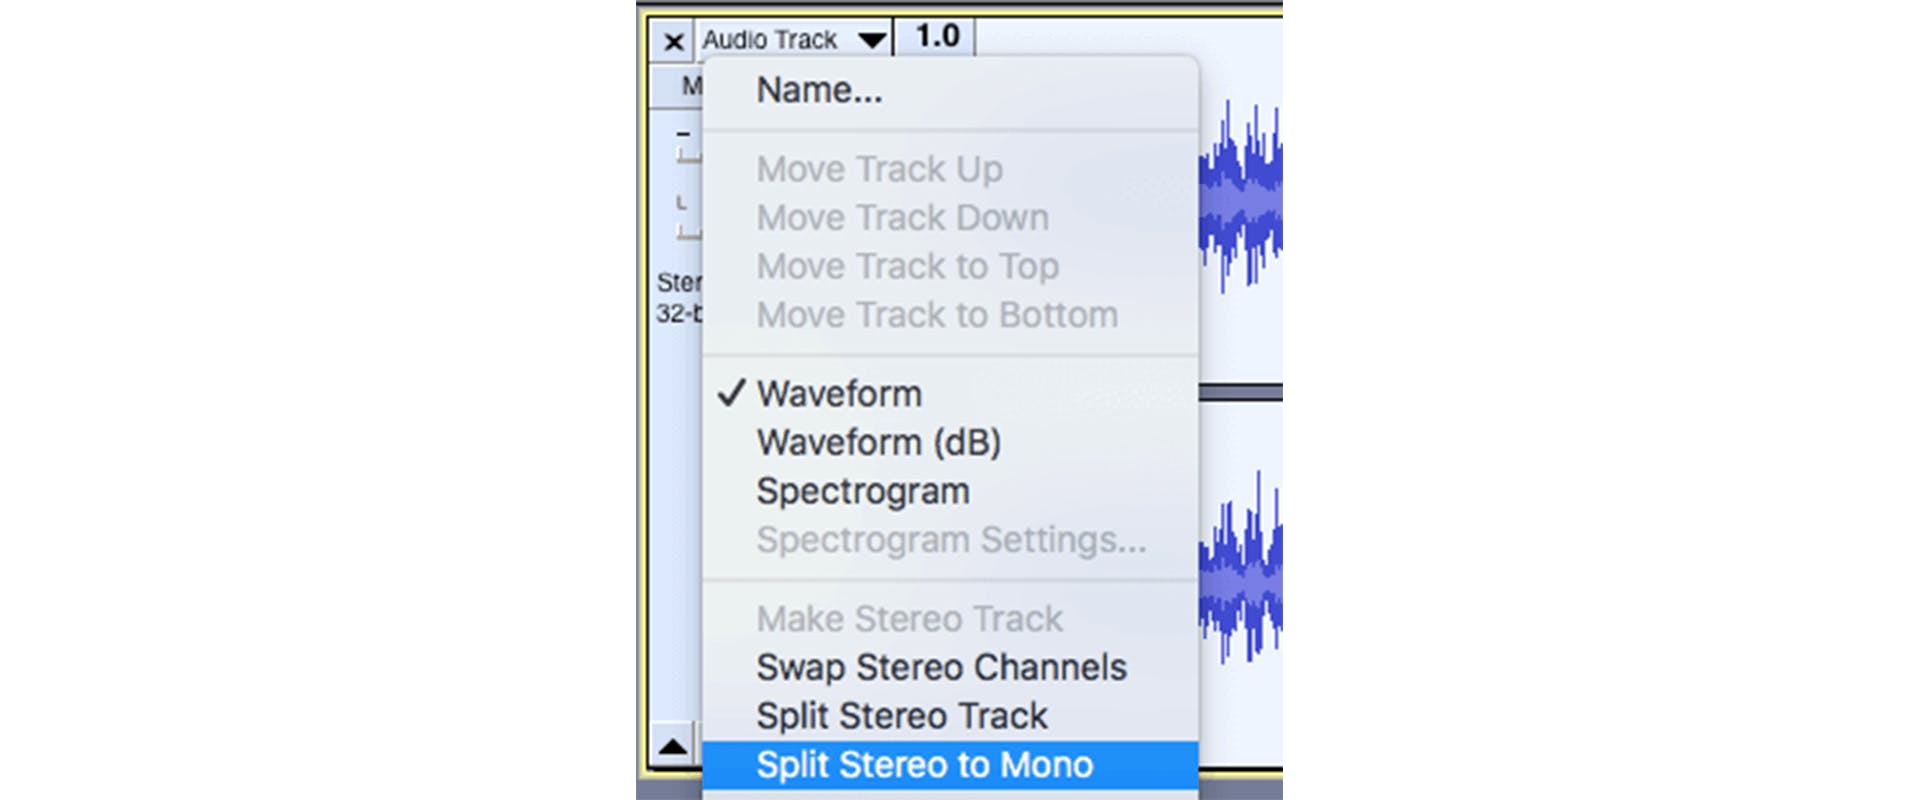
When you’re completed recording, you may want to separate the stereo file right into a pair of mono information for enhancing and mixdown. Click on the down arrow subsequent to the monitor identify and choose “Break up Stereo to Mono.” Every ensuing file will now be by itself monitor.
Alternatively, you’ll be able to go away the 2 channels linked as a stereo file via the enhancing course of and break up to mono as soon as completed. If that you must preserve the timing relationship between the 2 channels, this could make the job less complicated by eliminating the necessity to make cuts & timing changes to a number of tracks without delay.
A number of Tracks
When utilizing an interface/mixer with greater than two inputs, such because the Rodecaster Professional, you may want to vary your Recording Gadget and Recording Channels choices. By default, Audacity will assign a stereo combine from the Rodecaster Professional to channels 1/2, so you may want so as to add extra channels for every enter. Channel 3 will correspond to Mic 1, Channel 4 to Mic 2, and so forth.
Professional Tip: Every time potential, attempt to document every particular person onto a separate monitor. This provides you extra flexibility whenever you begin enhancing your audio information.
Enhancing
Along with your recording full, it is time to edit your podcast. Along with any audio you recorded into Audacity, you too can drag and drop extra audio information into the workspace to be used within the edit (intro/outro music, sound results, and so forth.). Every will routinely be assigned its personal monitor.
It is price noting that Audacity is an audio enhancing software program fairly than a DAW, and one of many key variations between the 2 is harmful vs. non-destructive enhancing. In Audacity, any change you make to your audio – splitting clips, noise discount, time-shifting, and so forth. – shall be written over the unique file as soon as saved. Maintain this in thoughts as you edit.
Should you recorded in one other free audio recording platform like Zoom, you’ll be able to import these information into Audacity to start enhancing.
Bear in mind the Instruments toolbar up high? Let’s test it out now.
Choice Device
The Choice Device works very like the cursor in a phrase processor. You should utilize it to set the playback begin level or choose segments of audio for processing.
For instance, if you wish to reduce and paste or delete a portion of an audio clip, you’ll be able to spotlight it and use your keyboard “reduce” command or press the delete key. Discover that whenever you do, Audacity routinely closes the ensuing hole by shifting the brand new clip boundaries collectively.

Alternatively, to depart timing intact you need to use the Break up Lower or Break up Delete capabilities – see Edit > Take away Particular > Break up Lower / Break up Delete.

Whereas not technically a operate of the Choice Device, an important characteristic to make use of at the side of it’s the Break up command, situated underneath Edit > Clip Boundaries > Break up. If you wish to create two particular person clips from a single clip, set the playback begin level with the Choice Device after which use Break up to separate them. It’s also possible to choose a phase of audio and use Break up to separate your choice from the content material earlier than and after it.

Time Shift
The Time Shift instrument is used to maneuver an audio clip ahead or backward in time. Whenever you’d like to vary the place of an audio clip in time, choose the Time Shift instrument and drag it ahead or backward on the monitor or between tracks. Notice that Audacity is not going to allow you to overlap two clips on a single monitor.
Envelope Device
The Envelope Device in Audacity means that you can fade in and fade out music tracks and make micro-adjustments to your audio information. When you choose the instrument, you may discover grey bars seem on the high and backside of every clip, bordered on the edges by a purple line. Click on and drag up or down to regulate the achieve of your entire audio clip.
Notice: that is distinct from the achieve slider on the monitor. Consider it as a “pre-gain” adjustment for getting your clip to a very good working stage earlier than you make stability changes amongst tracks with their achieve sliders.
A single click on of the Envelope Device on an audio clip will create a management level. To take away a management level, click on and drag it off of the audio clip.
Utilizing a number of management factors, you’ll be able to create achieve modifications throughout your clip, starting from easy fades to advanced dips and rises. A use case is perhaps letting your intro music are available at full quantity, then dipping it beneath some intro narration, making it come again up for a couple of seconds, and eventually fading out solely.

Podcast Episode Construction
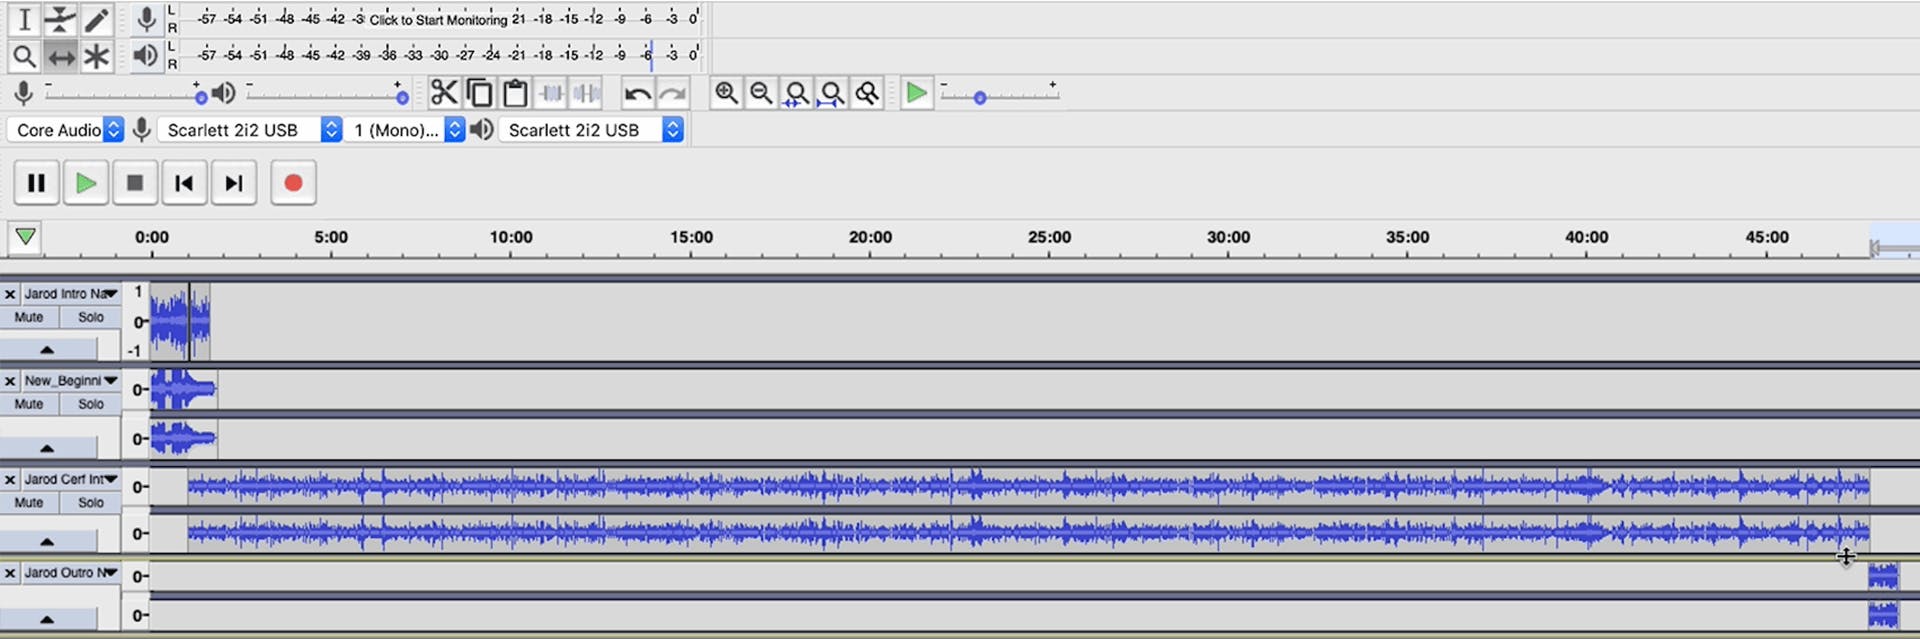
As soon as you’ve got edited your recorded and imported content material to your liking, you may want to rearrange and blend your audio tracks right into a cohesive episode. There isn’t any uniform method to do that, nevertheless it’s typically a finest follow to not put a number of varieties of audio on the identical monitor. Music, sound results, and every voice, for instance, needs to be saved on their very own tracks.
One construction choice to get you began is to rearrange your tracks chronologically, starting on the high. On this instance, we now have an intro clip taken from the interview that opens the episode, adopted by theme music on a monitor just under, then the interview itself, and so forth. This affords a stage of visible group, with audio cascading from high left to backside proper.
Another choice is to make use of one monitor per audio supply, which is able to reduce the variety of tracks required and save vertical actual property in your workspace. On this setup, the intro clip can be on the identical monitor because the interview, since they’re from the identical supply. Intro and outro narration can be on one monitor, assuming they have been taken from the identical recording. Intro and outro music may doubtlessly be on the identical monitor in the event you’re not utilizing completely different processing on them.

Export
When you’re happy along with your edit, the final step is to export it as a single file for add to your podcast host for distribution. We advocate exporting in a WAV file format to take care of a excessive stage of audio high quality all through your course of, then letting your podcast host transcode it to MP3 for you. In Audacity this is so simple as reaching for File > Export > Export as WAV.
A dialog will open the place you’ll be able to identify your file, select a vacation spot for it, and choose your WAV bit depth or select an alternate format (AIFF, MP3, and so forth.) in the event you need. Click on ‘Save.’
Audacity will warn you that your tracks shall be blended down and exported to 2 stereo channels (in case your session contains any stereo tracks) or one mono channel (in case your session contains solely mono tracks). The next dialog will assist you to embed metadata into the file in the event you select, however this isn’t crucial in case your podcast host handles metadata for you want Buzzsprout does. Should you desire to disregard both warning sooner or later, click on the field that reads “Do not present this when exporting audio.” Click on ‘Okay,’ and Audacity will export your file.
Voila! You now know use Audacity to edit podcast episodes.
Auphonic
A last suggestion that we make is to benefit from Auphonic’s podcast mastering options. Utilizing Auphonic as the ultimate step in your workflow allows you to optimize your audio for podcast directories like Apple Podcasts (previously iTunes) and Spotify.
To learn to use Auphonic, you’ll want to take a look at our full information and video tutorial. After you have your mastered file in hand, add it to your podcast host – and get to work in your subsequent episode!
Extra Audacity tutorials
Audacity is a wonderful open-source, audio enhancing instrument that’s extensively utilized by digital audio creators. These tutorials may also help you get extra comfy, so you need to use Audacity to confidently edit your individual podcast!